
I originally had my daughter (Juliana -AKA Jules) in mind when I made this tag, because as some may know her nickname is also "Ladybug." Well, I am also dedicating this to Jules (the C.I.LM. group Moderator) that passed away 2/7/09. Little did I know I had finished typing up the tutorial around the same time of day she passed. I am still in shock. My heart, thoughts and prayers go out to all whose lives she touched.
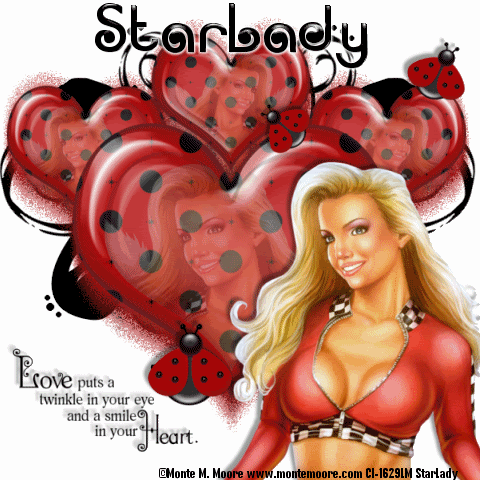
Click on tag to see full size
This tutorial is written for those with working knowledge of PSP.
I used PSP 9 for this tutorial, but it could be done with other versions I'm sure.
~Supplies you will need~
Supplies HERE
1 Tubes of choice – I used the awesome work of Monte Moore. Please do not use his work without a license from C.I.L.M .
1 Free “Heartfelt Scrapkit” Word Art and Doodle by Melissa- Thanks darlin’!! (in zip)
Her blog is HERE.
A “CU Glass Heart” (in zip)
Eye Candy 4000 > Gradient Glow (optional –used on my name)
The Drop Shadow I used is V,H (-5),Opacity 40, Blur 5, Color –Black
Font I used is called Acropolis Regular
~Okay Let’s get started~
Don’t forget to rename layers as you go
You might want to Adjust > Sharpen after you resize anything you need to.
Open a 600 x 600 transparent image (we will resize later)
Flood Fill the image white
Copy and Paste the “mc_CU glassheart” onto the tag-Resize by 80%
Layers > Duplicate –Resize it by 80%
Copy and paste a paper from the HS Scrapkit onto the tag,
X out the paper, Layer palette > activate the big heart layer
With the Magic Wand click outside the big heart layer
Un-X the paper and hit delete on your keyboard
Selections > Select None
Layer Palette > Select the big heart layer > Merge> Merge Down (with the paper)
Grab a tube
X out the big heart again
With the Magic Wand click outside the small heart layer
Copy and paste the tube and position it under the small heart
hit delete on your keyboard
Un-X the big heart layer
I lower the Opacity on the tube layer to 36, but the amount may vary
X out the white background, Merge > Merge Visible
Un-X the white background layer
On the heart layer -Layers > Duplicate –Resize it by 50%
Position the new small heart at top left under the big heart
Layers > Duplicate – Image > Mirror
Layers > Duplicate and position at the very top of the big heart
X out the white background, Merge > Merge Visible
Un-X the white background layer
Layers > Duplicate
On the copy of hearts layer > Effects > Toadies > Blast ‘n Blur (X effect 5 Y effect 17)
Layers > Duplicate and pull the top Blast ‘n Blur down just a little
Grab another tube for the ‘main’ tube –Resize (80%), position where you like and add a drop shadow
Copy and paste the ladybugs onto the tag, Resize them by 80%
Using the Freehand Tool cut them all away from each other
Paste each as a new layer, position where you like and add a drop shadow (same as before)
Copy, paste and position the “kiss” where you like
Layers > Duplicate until there is a total of four kisses, position where you like and add a drop shadow
Copy and paste the “SS My Desire Doodle,”
Layers > Duplicate, Image > Mirror, Merge > Merge Down both doodles
Layer Palette > Move the Doodles layer down just above the white background
Copy and Paste the “Word Art,” position where you like and add a drop shadow
Image > Resize ALL by 80%
Add all Credits needed
~Animation~
In PSP –Edit > Copy Merge
In AS –Right Click > Paste as a new Animation
In PSP – Grab the Eraser (size 40) and erase ONE the “kiss(es)”
Edit > Copy Merge
In AS-Edit Paste > BEFORE current Frame
Repeat until you have pasted the frame without any kisses on it in AS.
Edit > Select All
Animation > Frame Properties > 30
View> Animation
File > Save As a GIF (Blank)
Go back to PSP Add your name
Edit > Copy
In AS > Edit > Select All
Make sure “Propagate Paste” is toggled in
Edit > Paste > Into Selected Frame
View > Animation
Save AS Again
DONE I hope you enjoyed this tut.
If you have any problems please feel free to e-mail me at: starladystudio@bellsouth.net
I would LOVE to see what you have created!


No comments:
Post a Comment